Usage
Running the SAT Jobs and Pipelines
Note: These jobs can take up to 10 minutes to run per workspace.
Within the Jobs and Pipelines pane, there should now be two jobs available: SAT Initializer Notebook and SAT Driver Notebook.
- Run the SAT Initializer Notebook first. It only needs to complete successfully once, though it can be re-run if needed.
- Once the initializer completes, run the SAT Driver Notebook, which can be executed on a recurring basis. By default, it is scheduled to run every Monday, Wednesday, and Friday.
- Optionally, run the SAT Secrets Scanner Notebook to scan workspace notebooks for exposed secrets using TruffleHog. This can be run on-demand or scheduled separately based on your security requirements.
Once the Jobs and Pipelines have finished running, you should see the schema under the catalog that was set at the time of installation for SAT within the Catalog pane.

Accessing and Viewing the SAT Dashboards
SAT provides multiple dashboards to suit different audiences and use cases:
-
Main SAT Dashboard -
[SAT] Security Analysis Tool - Assessment Results
A comprehensive dashboard with detailed security findings across all categories. -
Executive Dashboard
A streamlined, high-level view designed for stakeholders and executives who need a quick overview of the security posture. -
Secret Scanner Dashboard
A specialized dashboard that detects and reports exposed credentials (API keys, tokens, passwords) across your Databricks notebooks.
You can use Databricks One to access and share the SAT dashboards across your organization, making it easier to distribute security insights to stakeholders.
Dashboard Configuration
The dashboards are, by default, owned by the user profile or Service Principal used during SAT setup. If you encounter errors when running the dashboard, they are most likely due to permissions issues. To update this behavior:
- Click on the dashboard and in the top right, click on the "Share" button.
- Click on the cogwheel icon and select "Assign new owner". Choose the new owner of the dashboard. Ownership can also be assigned to someone with access to the SAT catalog/schema and the underlying tables.
- Click on the "Published" icon next to the name of the dashboard towards the top of the page, and switch to the "Draft" version. Click on the "Publish" button that is next to the "Share" button.
- Choose from one of the two credential options:
- Embed credentials (default): All viewers run queries using the owner's credentials and compute.
This may expose data to users who wouldn't normally have access.
- Don't embed credentials: Each viewer must have access to the workspace and associated data to view the dashboard.
We recommend using this option for more secure access control.
- Embed credentials (default): All viewers run queries using the owner's credentials and compute.
- Choose from one of the two credential options:
- The dashboard can be shared with other team members by clicking the "Share" button from the "Published" mode.
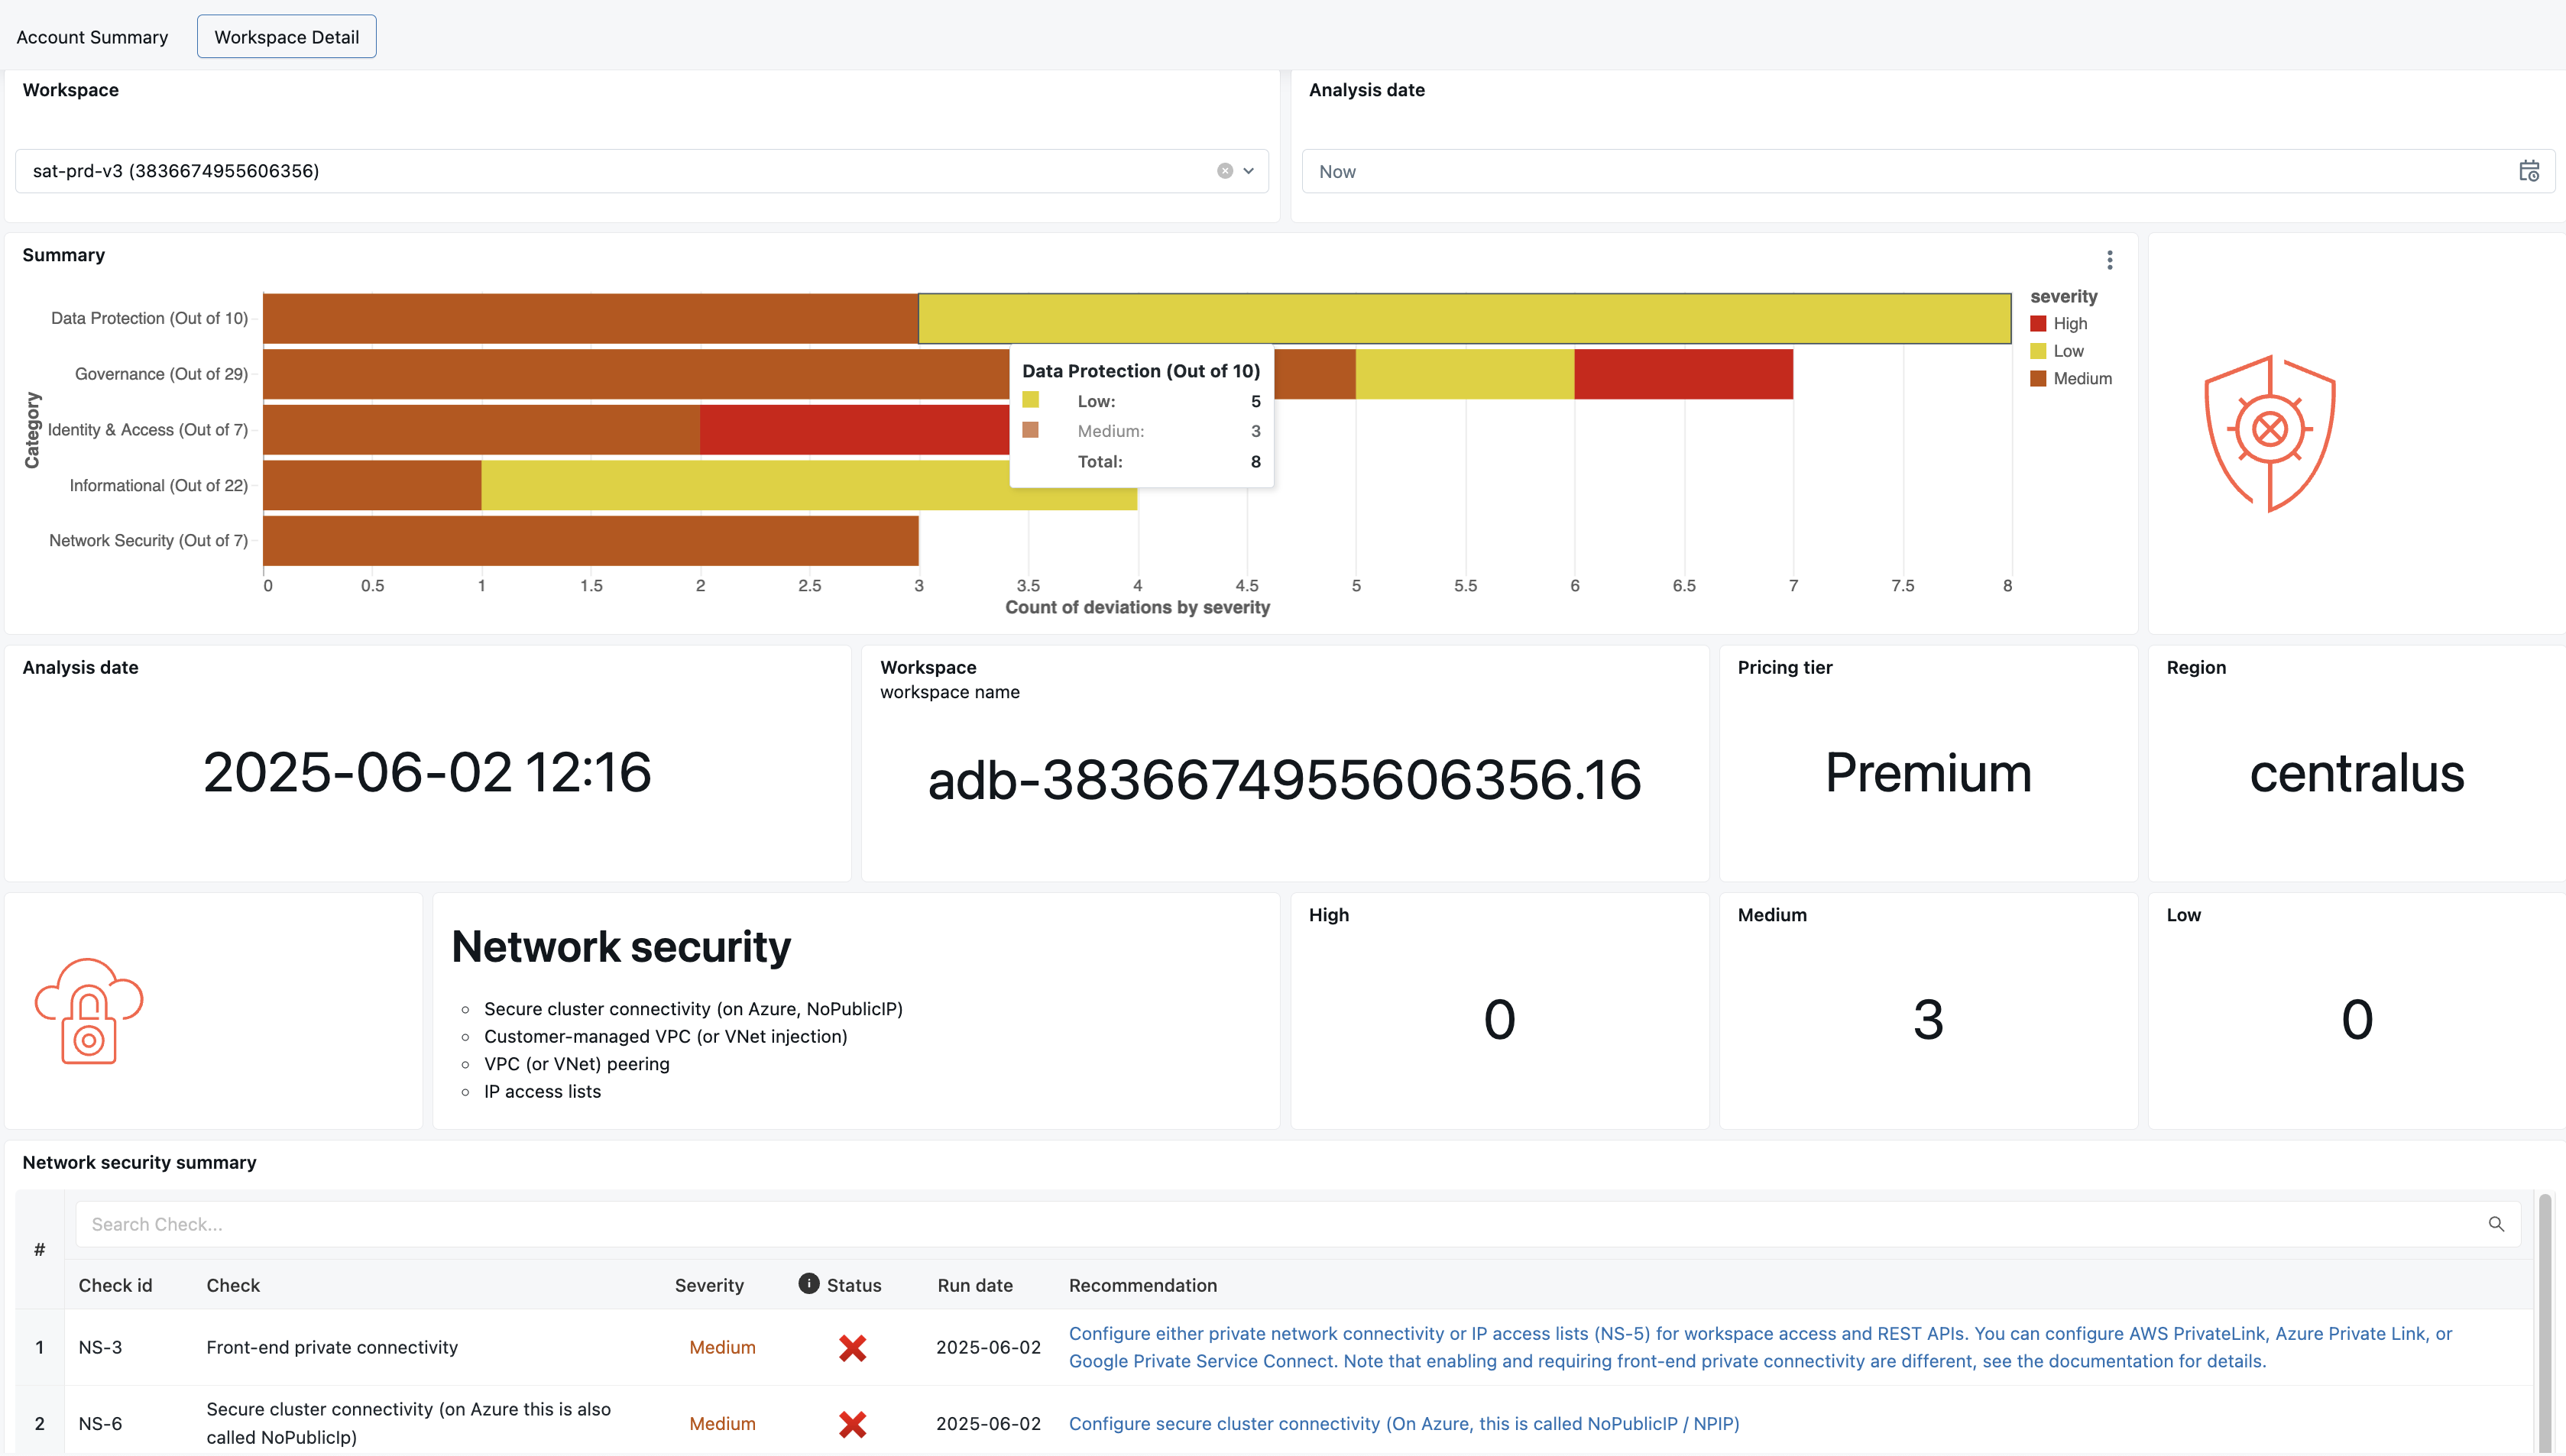
- This is what the SAT dashboard should look like:
Updating Configuration Files (Optional)
Modifying Security Best Practices
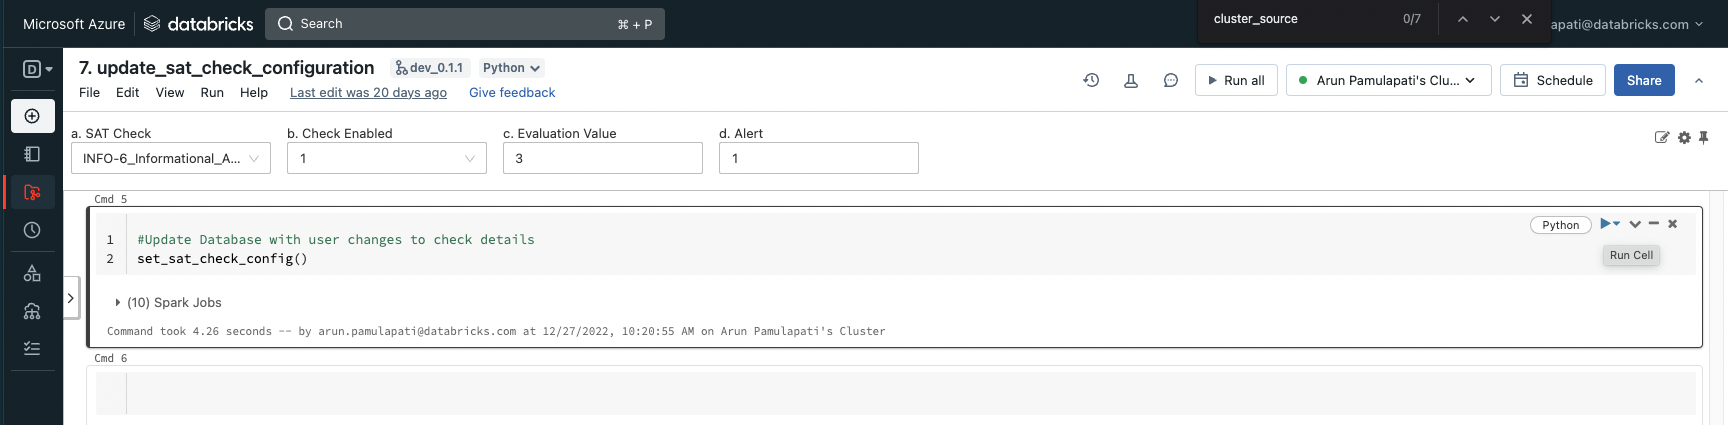
Navigate to Workspace -> Applications -> SAT -> files -> notebooks -> Setup -> 7. update_sat_check_configuration.
Use this utility to:
- Enable or disable individual checks
- Modify the evaluation value
- Update the alert configuration for each check
Configure widget settings on "Widget Change" for this notebook to "Do Nothing".
Modifying Workspace Configuration File
Required for manual checks values
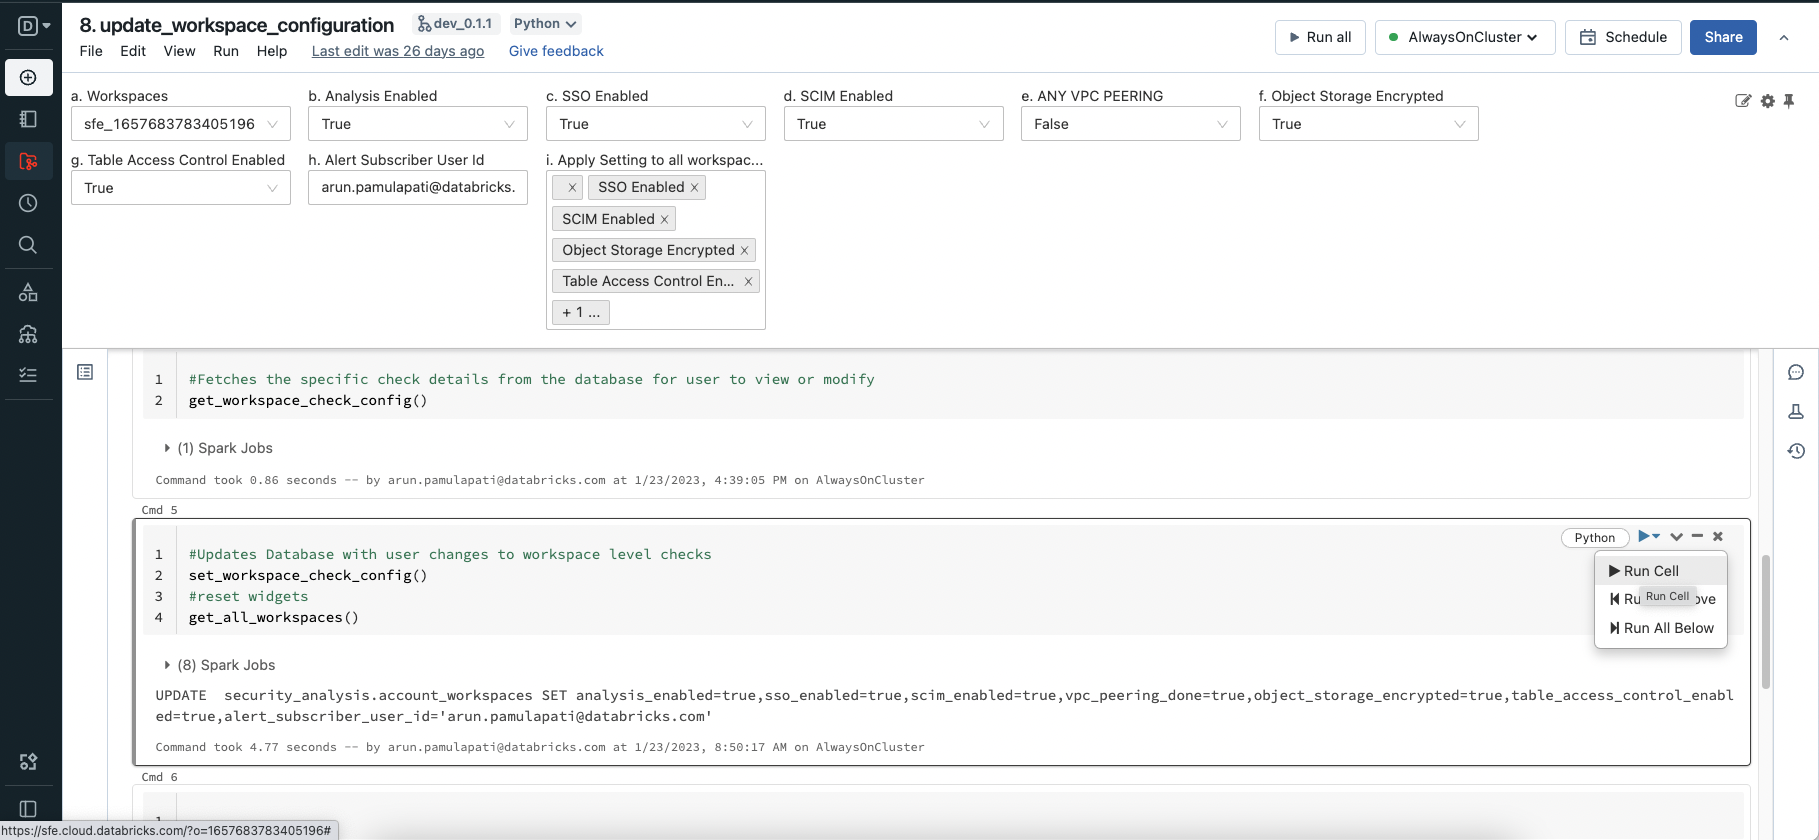
Navigate to Workspace -> Applications -> SAT -> files -> notebooks -> Setup -> 8. update_workspace_configuration.
Use this utility to:
- Enable analysis for a specific workspace by setting
analysis_enabledtoTrue, or disable it by setting it toFalse. - Turn on a specific workspace while turning off others for a focused run.
- Apply your configuration changes to multiple workspaces using the "Apply Setting to All Workspaces" option.
Configure widget settings on "Widget Change" for this notebook to "Do Nothing".
These settings are critical for running manual checks and ensuring accurate SAT analysis results.
Configuring Secret Scanning (Optional)
The SAT Secrets Scanner uses TruffleHog to detect exposed secrets in Databricks workspace notebooks. This includes detection of:
- Databricks-specific tokens (DKEA, DAPI, DOSE)
- AWS, Azure, and GCP cloud credentials
- API tokens and keys (GitHub, Slack, Stripe, etc.)
- Private keys and other sensitive credentials
Configuration
Secret scanning behavior can be configured via the trufflehog_detectors.yaml file located in the configs folder:
- days_back: Controls how far back to search for modified notebooks
- Set to
1to scan notebooks modified in the last day (default) - Set to
7to scan notebooks modified in the last week - Set to
0to scan ALL notebooks in the workspace (no time filter)
- Set to
- page_size: Number of notebooks to process per API page (default: 50)
- custom detectors: Add custom regex patterns to detect organization-specific secret formats
Firewall Allowlist Requirements
If your environment uses firewalls, you may need to allowlist the following GitHub domains to ensure secret scanning can download TruffleHog and access required resources:
Add the following URLs to your firewall allowlist:
raw.githubusercontent.comgithub.comtoken.actions.githubusercontent.comrelease-assets.githubusercontent.com
Viewing Secret Scan Results
Secret scan results are stored in the notebooks_secret_scan_results and clusters_secret_scan_results tables within your SAT schema and available to review via SAT Dashboard.